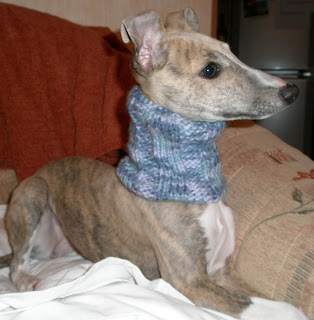
This neck cowl was knitted for my auntie's whippet puppy (Janie) and is simply a seamless knitted tube. It is a simple progression from the Neck Gaiter, in which most of the techniques required were explained. However, in order to make this neck cowl you will also need to learn to purl, as the ribbing is formed from a combination of knit and purl stitches. You will also need to use the magic loop technique, which is a method of knitting a seamless tube using circular needles much longer than the circumference of the tube you are knitting. This technique is well worth learning! It can be used for small diameter tubes, instead of double pointed needles (which many people dread) and is useful for knitting socks and the tops of hats and for making sleeves of baby garments seamlessly (amongst other things).
Using King Cole Magnum Chunky Multi, cast on 40 stitches onto 6.5mm 80cm circular needles, using the Double Cast On Method (also known as the Long Tail Cast On). This method of casting on will ensure a nice stretchy edge.
Join in the round, then knit in ribbing using the magic loop technique. I used 4x4 ribbing (Knit 4, Purl 4 repeated continuously), but I wonder if Knit 1, Purl 1 may look even nicer, or even Knit 2, Purl 2... It's up to you!
The ribbing makes the width of the cowl very forgiving. This size is great for Janie at 3-4 months of age but seems to allow plenty of room for growth. Feel free to adjust the number of stitches you cast on to fit your dog though. It's not only whippets that get cold!
Janie wears a harness, but if your dog wears a collar your may like to create a buttonhole in the cowl for the ring of the collar to poke through. To do this simply continue to work in your ribbing pattern until you reach an appropriate point for the collar and at the end of that round turn your work. You will work the next few rows flat. Repeat the following 2 rows until you have a hole of a suitable size for the ring of the collar to poke through then simply join in the round again and continue working in your original ribbing pattern:
Row 1: Knit 4, Purl 4. Repeat until the end of the round.
Row 2: Purl 4, Knit 4. Repeat until the end of the round. (Obviously, you should adjust these 2 rows to suit the ribbing pattern you have chosen to use).
Continue until the piece measures about 7 inches, but again feel free to adjust this length accordingly. This was knitted to allow Janie growing room before the winter but it looks good on her at the moment too, a little bunched up :-)


